Tuesday, June 8, 2010

Grits in the Garden

Wow it's been a long time since I wrote a blog! This is good, because now I can show major changes in both my AP system and garden, that may be lost if I were posting every day.

I changed out the growing media in my AP grow bed due to the gravel containing limestone which was breaking down in the water and keeping the water too Alkaline (high PH). Not good for plant growth... I threw down the money and bought Hydroton, which are expanded clay pellets. These are PH neutral and used by the Pros.

Before putting it into the grow bed I had to wash it.


Since I didn't want to have to do the whole cycling process again to re-establish the bacteria in my system, I seeded it with milk jugs full of the old gravel so there would be an established colony of bacteria which could spread through the clay pellets.


I planted lettuce and arugula after it had re-cycled (2 weeks). 2 days later I had sprouts!


The levels in my AP system are much better now without the limestone and I am hoping for better success this time!

The garden continues to flourish!


Garlic is within 1 month of harvesting! My tomato plants are doubling in size, and my peas are out of control and are flowering and beginning to produce delicious snap peas.


I planted Scarlet runner beans last week and they have sprouted over the last couple of days.

I have been having trouble with greens... I think part of the problem is that ants have been chopping them down.... After asking around, my good friend Duane (who is a good southern boy from North Carolina) told me that instant grits take care of ants. The ants eat them and the grits expand in their stomach and they explode. Sounds horrific, but its A LOT better than throwing chemicals on the garden. Duane said the only use for instant grits is precisely this, as "no respectable southern person would eat them".

I continue to grow sunflower sprouts with great success! I get harvests every few days, and a tray takes about 5-6 days to grow. The trick I found, is to soak the unshelled seeds for 24 hrs before planting.


I will try to keep this updated a bit more frequently now that "things" are happening at "1/2 Ash Farms"!

Tuesday, May 4, 2010

Cold Frame

Due to some added free time because of snow interrupting work (its May, enough with the snow!) I had time to build my cold frame and am now writing about it as promised.

Up until about a year ago, I had never heard of a cold frame. Not to say that anyone is naive, but just in case you are in the same situation I was in a year ago I'll explain what this is. A cold frame is essentially a mini green house formed by a box with a glass top. The idea is that even when it is cold out, the sun will heat up the interior of the box via the glass and then the contents of the box will stay warm through the cool/ cold night. Even if it is cold during the day, if the sun is shining the cold frame will heat up. A great way to extend the growing season if you don't have room, money or desire to build a green house.

People use all sorts of different materials to build their box (wood, hay bales, bricks...). I chose due to space limitations to build a well insulated box using stacked cinder blocks which I will eventually fill with earth as added insulation. To top it off, I purchased a old window from Builders Depot in Cortez which is a used building material warehouse. I was hoping to find used cinder blocks at the BD as well, but no luck...

I used Google Sketchup again to model how to best lay the cinder blocks and to get an idea of how many I was going to need once I obtained the window.

After adding some manure and turning the soil in the footprint of the cold frame I laid out the cinder blocks and voila, a Cold Frame. (Note the snow falling)


I added some additional soil and have planted Chard, Lettuce, Basil and Cilantro in half of the available space. In the other half I purchased a large seeding try which I am going to grow sunflower sprouts in.

I planted a trial batch of sunflower sprouts a week and a half ago in a lettuce container, and got my first batch of home grown greens on Sunday!


I am very happy with the results and the micro greens are very tasty! I bought these seeds from Let it Grow, but it was fairly expensive because I had to buy 3 packets of seeds as they don't sell them in bulk. Online I found a sprout supply supplier and have ordered 7 lbs of sunflower seeds which should be waiting for me when I get home! I'll plant these in my new tray and put it in the cold frame and let it soak up the sun!

Hopefully the snow is over for the year, and we can get on with putting more plants into the garden!

Tuesday, April 27, 2010

Never ending winter!

All hopes of putting more plants in the garden this past weekend were dashed upon arriving home to find snow on the ground. Winter refuses to give up this year! Instead of putting plants in the ground, I put bunches of horse manure courtesy of my friends Tom and Kelly.

I stopped by their house on Saturday and filled three 5 gal buckets with high quality Montezuma County hay fed horse manure.


I turned the unplanted portions of my garden and worked in about 10 gallons of the manure and then let the soaker hose run for a while to work it into the soil.

It actually works out well that I can't plant right away because the extra time allows the bacteria in the soil to begin the nitrogen cycle on the manure converting the Ammonia in the poop, to Nitrites and then into Nitrates which plants can then use as food (sound similar? the same process occurs in my AP system).

The seeds I started in my garden are growing nicely. My snap peas are growing rapidly and hopefully within the next couple of weeks I will be able to direct them to begin climbing the chain link fence they are growing along. I am planting climbing veggies along the fence in hopes that by late summer I will have a living fence!


The garlic also continues to grow in leaps and bounds!


The lettuce and arugula are also sprouting up nicely.

Since I was unable to put my tomato and cucumber seedlings in the ground, I decided that I needed a new place to store them. I had been keeping them on my desk because it receives a bit of sun during the day. As we get further into the year the sun has been creeping higher in the sky decreasing the light on my desk each day. To free up some space and get more light on my little green creatures I built a hanging shelf on my western "porthole window" from miscellaneous materials from around my house. Now my plants can get late afternoon sun and be out of my way. I think its pretty ingenious!


I had a near disaster this weekend when I left my cucumbers outside in their trays to get some light during a period of the lovely wind we have been having. I returned home to find the trays over turned and the seedlings in a pile on the ground... I quickly put them into peat pots, watered and gave them a dose of liquid sea weed in hopes to revive them. A couple plants appear to have broken stems, but as of the next day all of them had regained some rigidity and were looking healthier. I hope that they are not all dead when I return from Fruita on Thursday.

Check back in a week for the next blog which will hopefully be about sprout growing and cold frames!

Monday, April 19, 2010

Wigglin' Friends

Having dove head first into the art of agriculture I have acquired a great appreciation for worms. So, for another project I decided to start a worm composter. After extensive research online at the web site Red Worm Composting I set to constructing my own indoor worm farm.

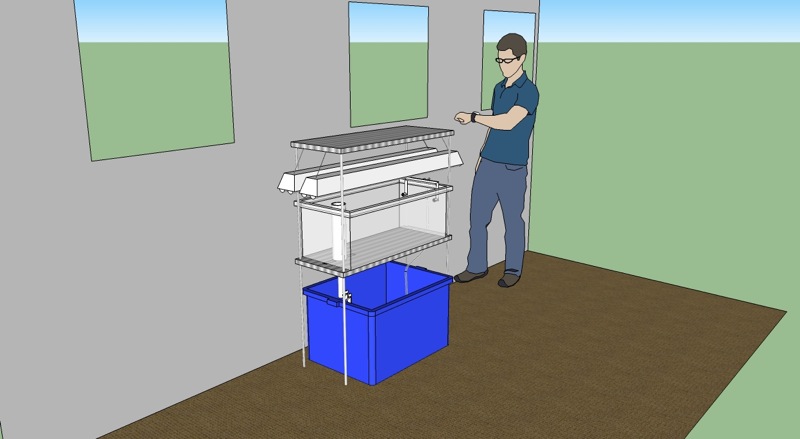
To do this I bought a 13 gal Rubbermade container and a spigot. I attached the spigot to one end to act as a drain for any nutrient rich moisture that accumulates. I then drilled small holes in both the sides of the container and the top to ensure adequate airflow through the bin.


To begin making a suitable environment for the worms, I shredded card board, and brown paper. Shredding the paper as opposed to just layering it allows for better airflow throughout the bed allowing the worms to do their job more effectively.


In the bottom of the bin I put wet, but not dripping, paper to form a bed for the worms. On top of that I began to accumulate left over fruit and veggies, and on top of that goes dry or moist paper.


With all this together I let it sit for about a week while I was waiting for my worms. Letting the compost sit for a bit before you add worms is beneficial to let bacteria grow and begin to break down the organic matter which makes eating easier for the worms. Not only do the worms eat the veggies, but they will also eat the paper products.

After searching around Cortez for Red Wiggler worms (the best kind supposedly for composting) to no avail I found LOTS of places online that sell worms! I finally chose Uncle Jim's Worm Farm because they had free shipping. Now the worms aren't local (bummer) in fact they come from the Susquehanna Valley in PA. Apparently good composting worms don't grow in the dry desert, who would have thought! After 5 days, I got a package marked "Live Worms". They are shipped in a breathable bag with dry mulch in it to suck out moisture and prevent freezing. Opened the bag to 2000 wigglin' friends!


And into the bin they go to eat and drink after their long journey!


As we speak, the worms are hopefully eating all of the goodies in the bin and producing worm castings, black gold. I can then take these castings and put into my garden as super rich fertilizer to grow more plants whose waste will go into the worm bin and the worms will make more black gold to make more plants...etc. Pretty good recycling, ehh? Not only do you get use all of your waste organic matter but also your waste cardboard which saves a trip to the recycling center and the eliminates the need for the energy consuming recycling process.

OK, now a few cool facts about the worms. Each worm will live for about a year and each day will produce its weight in worm castings. Each worm can reproduce in 90 days which means that every 3 months, excluding worm death, your worm population will double. This is great because these worms also are great garden worms and go well in my AP system eating up solids which are trapped in the growing medium.

Since I live in the Tiny Mansion, every thing has to be tiny. But someday I will hopefully create a much larger worm bin to be able to handle many thousands of more worms and much more compost.

It's cheep, easy, low maintenance and pays for itself quickly (go look how much black gold costs at a nursery!). It also fits nicely under the bathroom sink!

Sunday, April 18, 2010

Banana Peel

Well it’s been a while since my last post mainly because not much exciting has happened in the Tiny Mansion Aquaponically speaking.

I did a couple of hard ware changes which has improved the timing of my pump. The first upgrade is a digital timer for my on/off pump sequence. I had been using a $4 analog timer which has 15 min increments which are closer to 18-24 min increments. Not ideal… Online if found a 20 on/off per day digital timer which is proving to work out great, and it was less than 20 bucks. The other change I did was shorten the stand pipe which drains my grow bed to a height which prohibits the water to ever completely inundate the gravel. This is something I should have done from the get go, but in my eagerness I completely looked over it.

My fish are doing very well. Only 1 death in the past 3 weeks, and I even nursed a sick fish back to health by isolating it and giving the water a good dose of salt. The rest of the fish are enthusiastically eating and noticeably growing in size. One of the two survivors from the original batch of fish has about doubled in size and is probably 3 inches long.


The plants are not making such leaps and bounds. Things are alive, but are not growing well at all. I think this is due to too little nutrients for too many plants. I have been thinning some of the sprouts, but I think I will have to become more drastic with this, and I will also hopefully be able to get a few more fish soon. I have been having some graying of my arugula and I don’t exactly know what is causing this. My newest hypothesis is potassium deficiency. So to help counter this, I buried a banana peal below my input pipes. A lot of folks who have AP systems do this, so hopefully this helps.

Ok, onto the dirt garden. I installed 50’ of soaker hose through the garden that seems to be doing a good job of getting water to most of the garden. The garlic continues to grow well and I am starting to see lettuce, peas and arugula come up. In the west end of the garden there are a lot of seedlings that I didn’t plant and I think they are volunteer tomatoes from ground fall ‘maters from last year. They are growing in my melon and dill bed, and I am going to make sure they are not either of those before I pull them.

My seedlings are also thriving and about ready to put outside. Hopefully next weekend the weather forecast will show that we are past the below freezing nights so I can put my tomatoes and cucumbers in the dirt.

Next weekend I am also going to get home horse manure for an added nutrient boost! I'll make sure to get photos of collecting manure!

Tuesday, April 6, 2010

Google Sketchup

I recently found out about this great new (?) program called Google Sketchup. Pretty much it is a 3D modeling program which is fairly comprehensive and easy to use with great online tutorial videos. I decided to attempt to make a scale 3D model of my AP system as practice for when I am designing a new and large system in the future. Anyway, the final product is below.


In Fruita until Thursday night. Hope the system is functioning well. Will post an update probably on Monday, once I get off a weekend San Juan trip!